3 Keys to Tendinopathy: De-load, Static Hold, Progressive Load
Tendinopathy (tendon aches and pains – most common in Achilles & Patellar Tendons) is awful – especially when you are an athlete! Before I begin writing this segment, let me preface it with this: I am not a physical therapist or a doctor. I AM, however, a former collegiate & professional basketball player that had plenty of injuries with a Master’s Degree in Clinical Sports & Exercise Medicine.
I will keep this as simple as possible with references. Many times, tendinopathy is not treated properly in the United States. Simply put, there is an over-reliance on icing & resting, or resting & strengthening, without attention to the details that researchers such as Jill Cook and Ebonie Rio, both who are physical therapists and researchers who have spearheaded research to determine the best courses of action to treat tendinopathy (see videos below).
I highly recommend the videos below for more knowledge, but here is a brief summary:
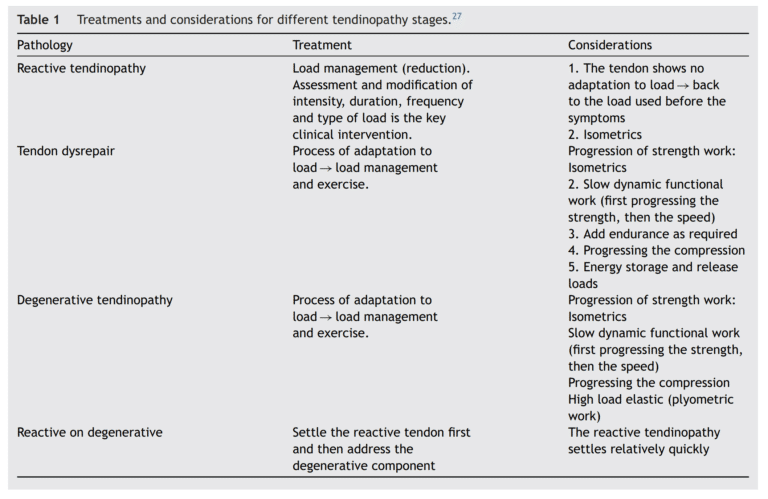
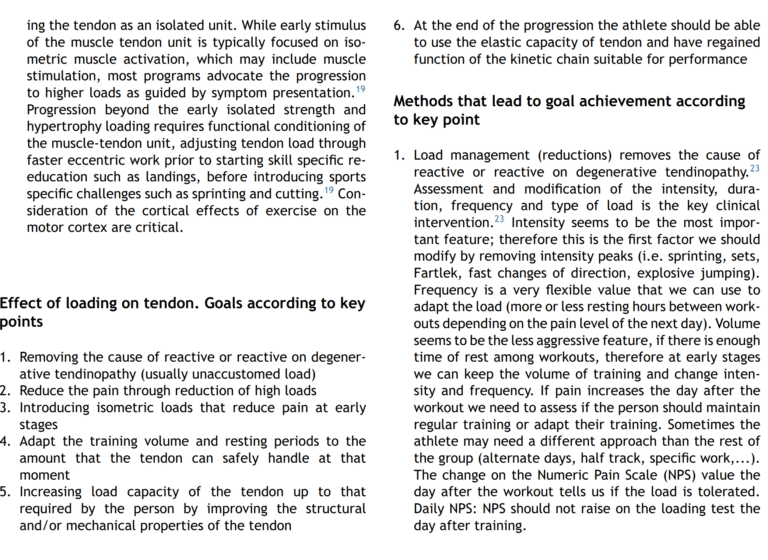
- Properly de-load the tendon, not COMPLETELY de-load.
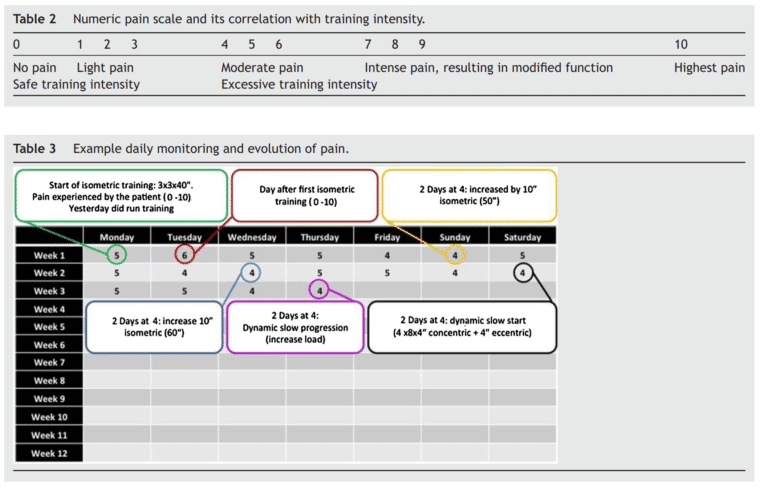
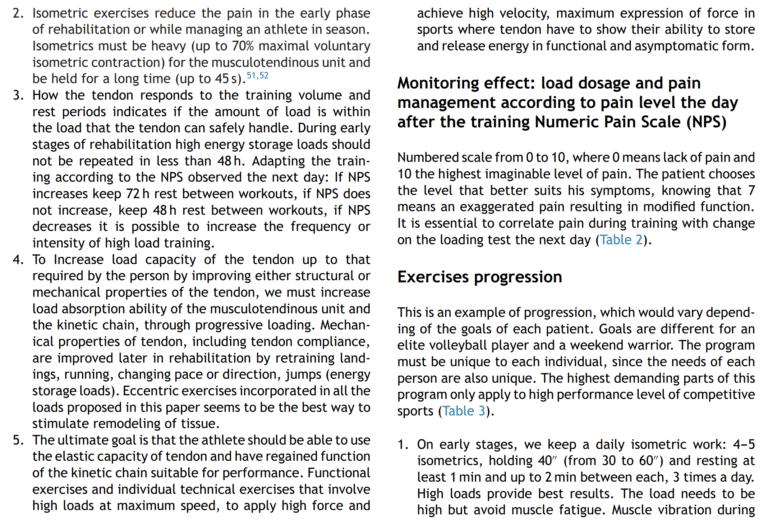
- Find an isometric load that can be controlled (no shaking) and that does not provoke a pain response. This could be open and/or closed chain at the joint angle of pain or 5-15 degrees above or below it. It is important you feel a muscle contraction and not pain in the tendon.
- At the proper load, progress to 5×45”. 3x/day.
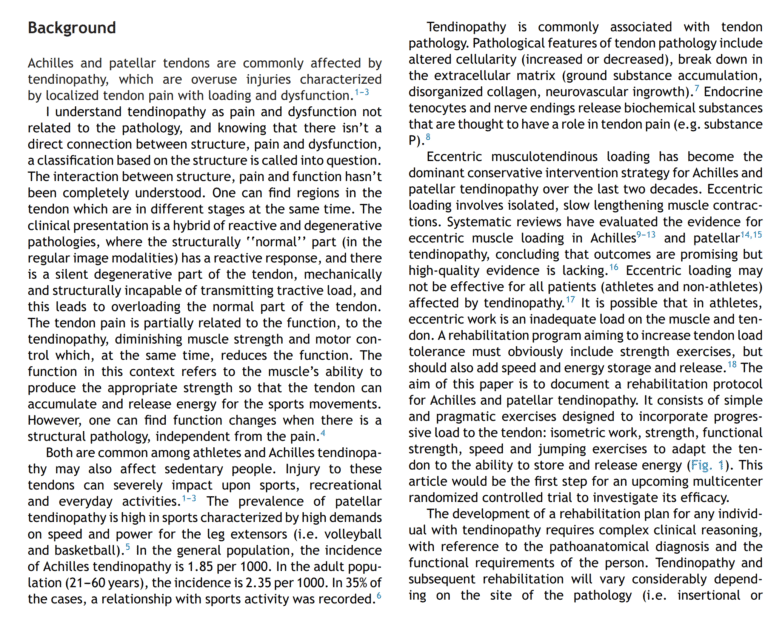
- Over time, increase the load (below body weight -> body weight -> 1 limb ->progressive load -> supramax load).
- Option 1 for below body weight: Open chain with an unloaded contraction. Look up the origin and insertion of the muscles, bring those two points together via strong mental contraction of the muscle.
- Option 2 for below body weight (lower body): Seated, pushing into the ground or the wall
- Option 3 for below body weight: Suspension trainer to take off some of the body weight. From here, progress to bilateral, unilateral, progressively weighted load.
- When a tendon can take supramaximal loading, progress to the eccentrics, then isotonics (slow concentric/eccentric) and then work on fast eccentrics, fast concentrics, and eventually your plyometrics & jumps/sprints.
Other options to reduce pain responses include desensitization of the region that may include friction, skin stretching, deep pressure, and visual & vestibular exercises (among many others). Remember – pain lives in the brain, and different inputs will lead to different outputs (see Adriaan Louw, David Butler & Lorimer Moseley).
Sample Progressive De-Load to Overload – Start at a point that is difficult but does not cause pain)
- Deloaded Isometric Contractions (Mental Contraction, Seated Contraction, Assisted e.g. TRX Contraction) – start at 5” work up to 2′ pain free. Work from submax to maximal contraction.
- 2L BW Isometric (static) contractions aka 2 Legged Bodyweight Load. 5 Levels – Straight Leg Heel Raise Hold, Slightly Bent Knee with Heel Raise Hold, Slightly Bent Knee with Floating Heel (paper thin off ground or on a stair), Squat Position Heels High, Squat Position Floating Heel (paper thin off ground or on a stair). Be sure to always actively push through toes. Work up to 3′ each with no pain.
- Lunge Position Isometric (static) Holds. Work up to 2 minutes. Repeat #2 positions, but now in a staggered lunge type stance repeating all depths.
- Repeat # 3 but on 1 leg for each ankle/knee joint position.
- I have also started to use multiplanar Isometric holds for 2L & 1L. This seems to work different parts and create more end range strength & stability for different parts of the foot & ankle complex.
- Eccentric Heel Drops. Raise up on 2 legs, let down slow for a 4 count on 1 leg. Start at 5 reps, Work up to 25 reps. May need to be done every other day. Do appropriate isometrics afterwards as needed if any pain arises.
- Slow Isotonic Heel Raises.. 3” count up, 4” count down. Start with 2 legs, progress to 1 leg. Do as many as possible, pain free. Work to do 70 (I have been told that this is a Jill Cook requirement for all ballet dancers she works with before they can do ballet).
- Fast Heel Raises. Work up to 100 2 Leg & 1 Leg. Start at 25. Listen to your body. Do not go into tendon pain.
- Depth Drops – progressively increase floating heel landing drop height. First increase volume, then increase height. Progress over time and inversely (e.g. 20 inches for 10 reps, then 12, then 15, 18 etc. Do every other day.)
- Jump rope – submaximal plyos with rapid eccentric & concentric. Start at 5′ work up to 20′. Again, listen to your body.
Currently, I am working with multiplanar calf raise holds & movements from 4-7. This seems to produce more strength and resiliency in positions the foot and ankle need more exposure to when building up to higher level movements e.g. cuts & jumps. This better loads foot inversion & eversion muscles more specifically. Theoretically, this can be done as early as Level 1, however I have found that the multiplanar aspects are generally not as well received when looking to simply create the analgesic effect intended with basic isometric (static) holds.
NOTE 1: that I have gone past the majority of PT recommendations for time for Isometric holds. I have found that 45” is not enough help the tendon accommodate to greater loads of shorter times.
NOTE 2: LISTEN TO YOUR BODY! ESPECIALLY AS AN ATHLETE! Depending on where you are with your return to play protocols, your load, impact, & fatigue will change daily. One day you may be able to do a 1 Leg Isometric hold without any issue. Another day, that can provoke a pain response. If that happens, de-load to either a Lunge Position Load or a 2 Leg Load for that day. Your tendons will thank you!
Chicago Recommendation for Physical Therapy
Train While Coming Back from Injury
